
Chickpeas! Think of them as the legume world’s answer to cauliflower. That is, they’re super healthy yet fantastically versatile in unexpected and increasingly trendy ways. Of course, turn to the Middle East, Syria, India, Morocco, Lebanon, Greece, and Italy for a range of delicious garbanzo-based dishes ranging from hummus and falafel to dahl and Moraccan stew. But what about chocolate chip and merengue cookies? Or a stand in for salty snack foods, egg salad, mayonnaise, crackers, even ice cream?? *mind blown*
Jump to Recipe:
- Cooking Chickpeas
- Basic Garlic Hummus
- Eggless Chickpea Salad
- Chickpea DIY Burgers
- Quick Greek Salad with Chickpeas
- Chickpea Stir Fry
- Chocolate Chip Chickpea Cookies
- Oven Roasted Turmeric Chickpea Snacks
- Aquafaba Inspiration
First, a little bit about chickpeas (also called garbanzo beans) in general. These cute little beige beans look like cute, round little brains or tushes (and they’re good for both). A part of humans’ diets for approximately 10,000 years, they were domesticated in the Fertile Crescent and then spread to the Mediterranean and India, and beyond. Like all beans, they have a satisfying mix of protein, fiber, complex “slow burn” carbs, antioxidants, phytoestrogens, vitamin (including folate), and minerals (such as iron and zinc). Their mild flavor easily adapts to many recipes where they can almost miraculously sub in for meat (especially chicken), wheat flour, potatoes, or eggs! Unfortunately a most of the store-bought chickpea snack foods are rancid — all the more reason to make. your own from scratch.
In 100 grams (3.5 ounces) of cooked chickpeas, you’ll get approximately…
- 8 grams of fiber
- 9 grams protein
- 27 grams total carbs (complex and slow burn!)
- And for your daily value intake of select nutrients…
- 4-11% B vitamins
- 43% folate
- 22% of your iron
- 14% magnesium
- 16% zinc
- all in just 164 calories! (USDA)
- Microbiome Challenged?
Far more studies show benefits rather than harm to a bean-rich diet. Diabetes (yes, even with their carb content!), heart health, weight management, reduced cancer risk, better hormone balance, and even better bone density are just a few of the perks. But perhaps you’re what I call “microbiome challenged.” That is, your gut flora isn’t out of whack and/or not accustomed to eating beans, leading to terrible flatulence.
Often this is solved with repeated exposure, which gradually shifts your microbiome (usually for the better) to improve your ability to digest beans. In a study on beans and flatulence, eating beans daily caused flatulence in 20-50% of participants on day one (pintos and baked beans were worse than black eyed peas). Within one week, these numbers dropped sharply and continued to drop in the weeks to come. By the eight week, only 3 percent still experienced flatulence.
If you don’t digest beans well, I suggest:
Prepare them from dry using the quick soak or long soak method to remove as much of the gas-producing constituents as possible.
Introduce them slowly and gradually. Perhaps just 1 tablespoon per day at first, then gradually increase as your digestive response settles. Hopefully within a week or more you’ll notice flatulence fading.
Stick with it!
Boost digestion with carminative spices, a little vinegar, and/or digestive bitters.
Yes, chickpeas are a high FODMAP food that might not agree with some folks no matter what you do. (And occasionally people just don’t tolerate beans for other reasons.) But I strongly suspect (and science backs) that the main reason Americans have such a hard time eating beans is that we eat them so rarely in our diet and then eat the in a big serving of chili, hummus, or baked beans. Digestive systems need time to adjust (as any dog owner can attest – it’s better to slowly switch over to new food or else risk messy accidents). That said, if you have SIBO, you’ll want to first get your gut in gear and then slowly reintroduce problematic foods like beans.
Are Beans Toxic?
As far as anti-nutrient concerns go, while raw or under-cooked beans certainly are indeed bad for you (especially kidney beans), the risk of lectins, phytohaemagglutinin, pytic acid, tannins, and other potentially toxic “anti-nutrients” is practically zilch if they’re prepared properly – soak, drain, then cook thoroughly. (Canned and pressure-cooked beans should also be safe.). The harm risk is greatest with raw or undercooked beans, but I’d also be cautious with bean flour – including some gluten-free flour blends – and slow cooker beans.
Chickpea Recipes
I’ve been fortunate to be exposed to chickpea recipes from people who adore and depend on them as a staple dish and know how to cook them well. From my vegetarian college girlfriend who first served them to me (“They taste kind of like chicken!” she prodded) to my close friend’s Syrian chef husband, as well as so many vegetarian and gluten-free potlucks, and my time sharing lunch in the break room with health-conscious coworkers in natural food stores and Natural Health magazine.
Cooking Chickpeas from Dry
The best way cook beans for maximum digestibility and the least amount of “antinutrient” compounds like phytic acid is to soak, drain, then gently simmer. I prefer buying dry organic chickpeas in the bulk section of the Concord Food Co-op. Better quality and fast turnover, they cook much faster than the bags that have been sitting on the bottom of the shelf at the conventional grocery store for who-knows-how-long. Like 20 minutes instead of hours.
- Soak: Cover with an inch or two of water and soak overnight (or prep in the morning to cook at night). If you’re “in a rush” you can do the “quick soak” by boiling for five minutes, then letting them sit for 1 hour – this method might actually produce the last gas.
- Drain: Drain the soaking liquid, rinse, then cover with water.
- Simmer, testing periodically: Gently simmer, covered. My co-op beans usually only take about 20 minutes to cook, but older bags of chickpeas typically take 1.5 to 2 hours. This is a nice thing to have on in the back of the stove while you cook and eat another meal. Test periodically. By piercing with a fork. They’re ready when they’re fork-tender, plump, and soft inside somewhat like a baked potato consistency. When they seem done by the fork, taste or bite to make sure (don’t eat undercooked beans). Tender but firm chickpeas are best for salads and stews. Overcooked mushy beans are perfect for making hummus, fritters, cookies, and aquafaba. If desired, add salt just at the very end (if you add salt too early, they’ll remain tough), which will improve chickpea longevity in the fridge. Refrigerate for about 5 days or store extras (with or without liquid) in the freezer.
Canned: While I do like cooking my own chickpeas for flavor, economics, and control, there’s no shame in just using store-bought canned chickpeas! Any brand will do. Favorites include Organic Goya, Eden, or Westbrae.
Pressure/Multi Cooker: Yes, you can definitely cook them this way without soaking, but I prefer to soak and drain my beans first for maximum digestibility. Refer to your appliance guide for cooking times and be remember that the source of dry beans you use can change the cooking time dramatically.
Ways to Enjoy Chickpeas ~ The Traditional
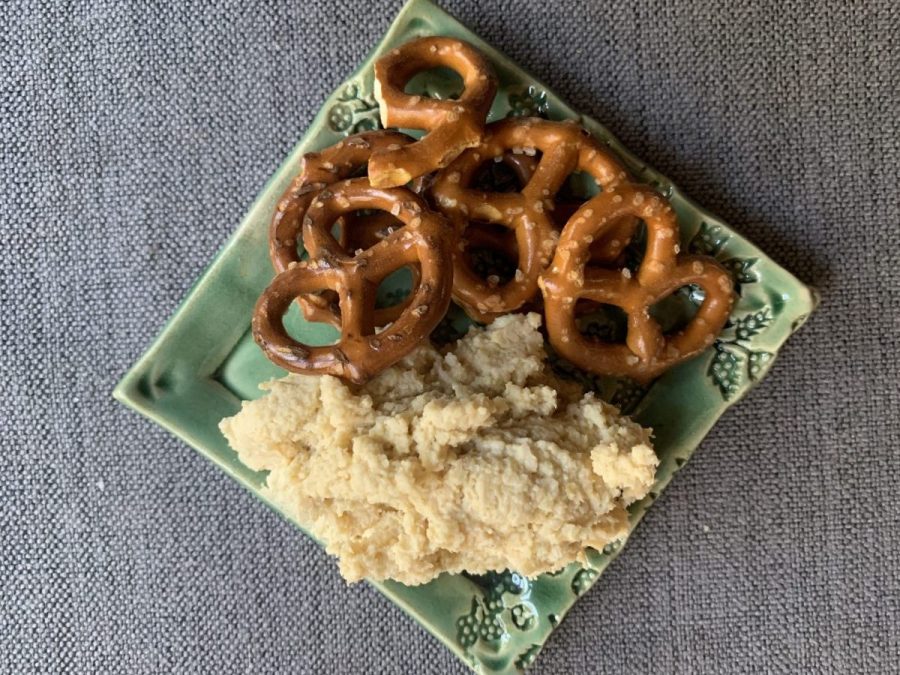
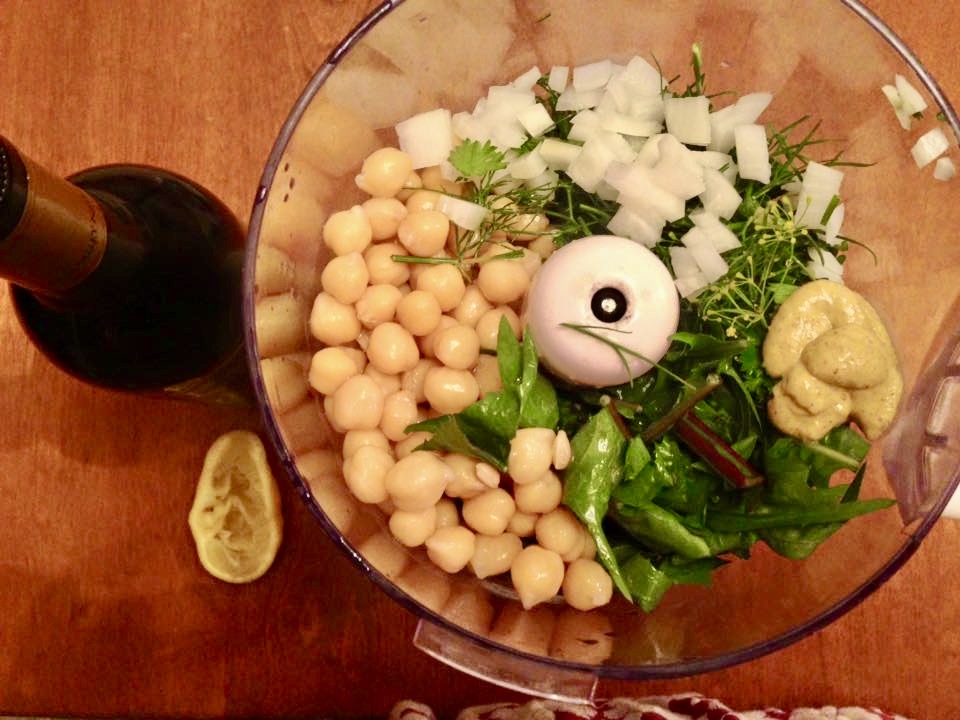
Basic Garlic Hummus
This mash up between the recipe I learned from my friend’s Syrian chef husband and the one served by the Barley House in Concord, NH.
- 2 cups of drained chickpeas (reserve chickpea water)
- 1-5 cloves raw garlic
- ½ cup tahini, or more to taste
- Juice of 1 lemon, or more to taste
- Optional 1 pitted date or teaspoon of honey for sweetness
- Salt to taste
Puree all ingredients in the food processor. Drizzle in chickpea water as needed to get a smooth, soft consistency and add salt to taste.
Serve with toasted pita chips, pretzels, tortilla chips, or veggie sticks, smear on sandwiches, or smear artfully on the bottom of a plate while serving well-paired cuisine.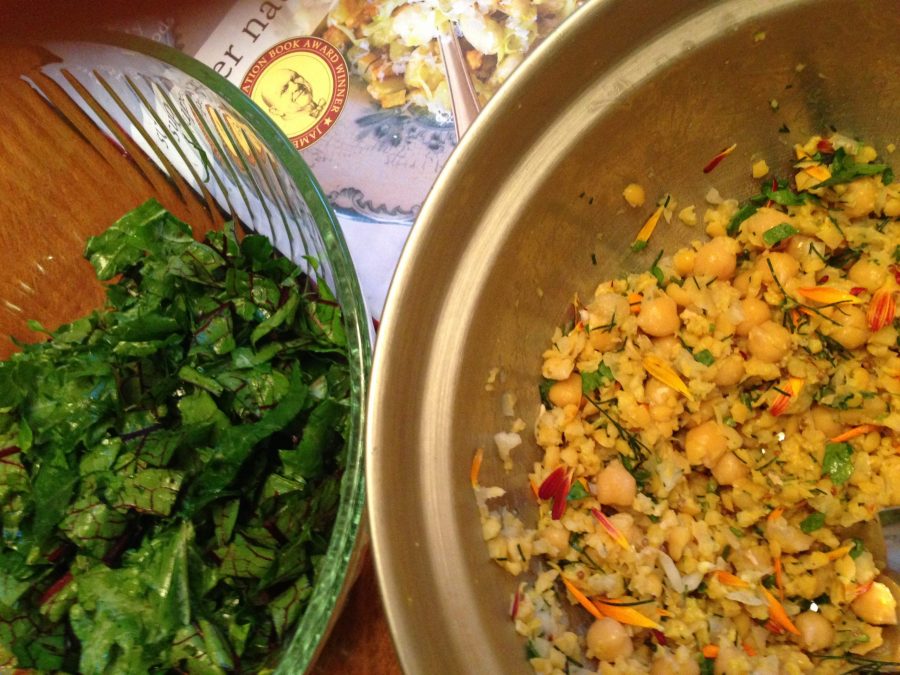
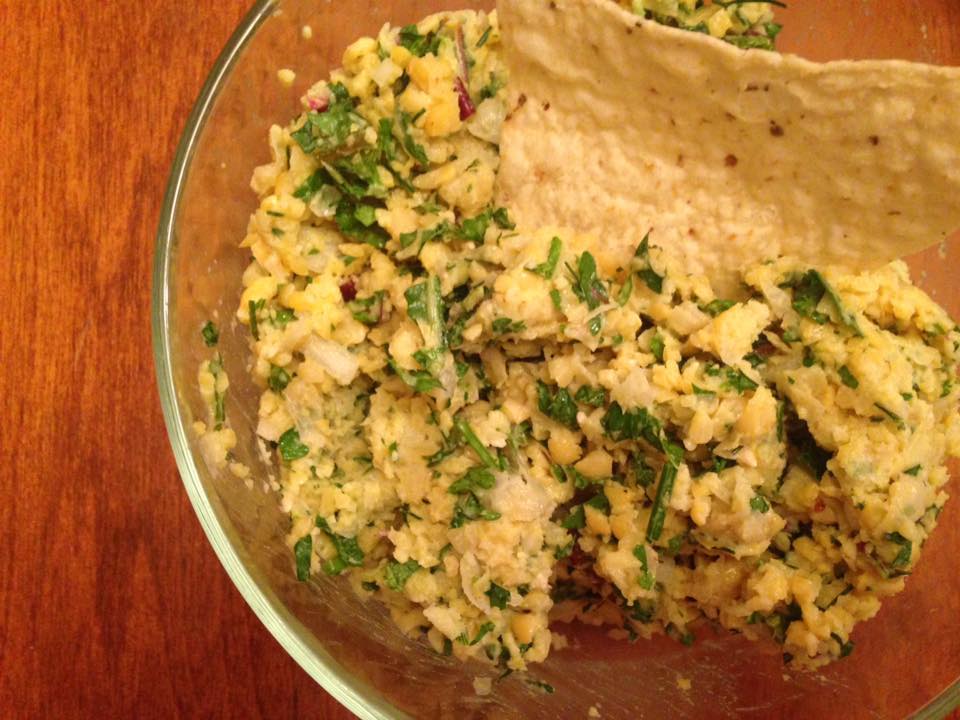
Eggless Chickpea Salad
Adapted from Heidi Swanson’s vegetarian comfort food cookbook Super Natural Every Day, this is a hit at potlucks since it’s yummy, filling, and free of all common allergens.
- 2 cups of chickpeas, drained
A little bit of…
- Onion (~1/3 cup chopped)
- Celery (~1/3 cup chopped), optional
- Fresh dill (~2 tablespoons)
- Plain yogurt (~2/3 cup) or mayonnaise, optional
Dab of…
- Dijon mustard (~1 ½ tablespoon)
- Lemon juice (~1 tablespoon)
- Salt to taste
- Decorative calendula petals from garden, optional
Pulse (rough chop) the ingredients in the food processor. Stir, taste, and adjust as desired. Serve on lavash bread, pita, toast, or tortilla chips. Lovely as a wrap with greens. Or just eat it plain.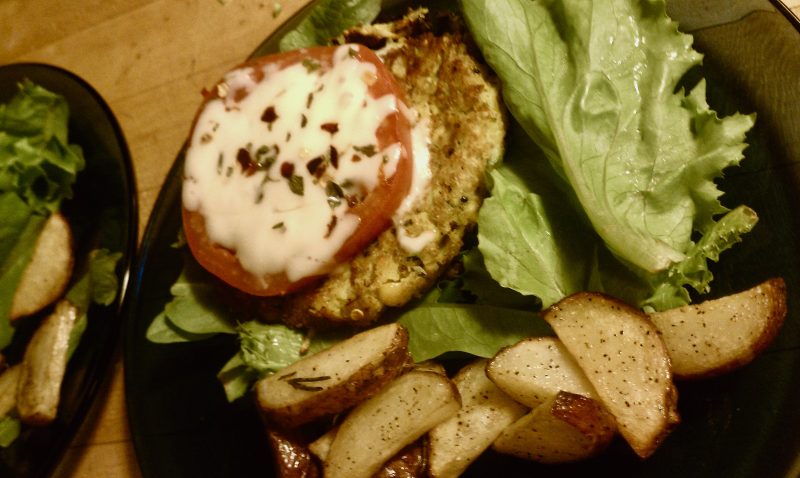
Chickpea Burgers and Fritters
There are so many variations on this theme! From fried falafel to a quinoa-chickpea based pan-seared “burger.” See my DIY Veggie Burger post for inspiration here.
Quick Salads
Chickpeas + greens + Greek or Italian dressing makes a super fast salad. You can get a wee bit fancier by adding them to a fully formed Greek salad (with yummy feta, olives, pepperoncini…). Perhaps some canned sardines for added heft. Or use the oven-roasted chickpeas in place of croutons.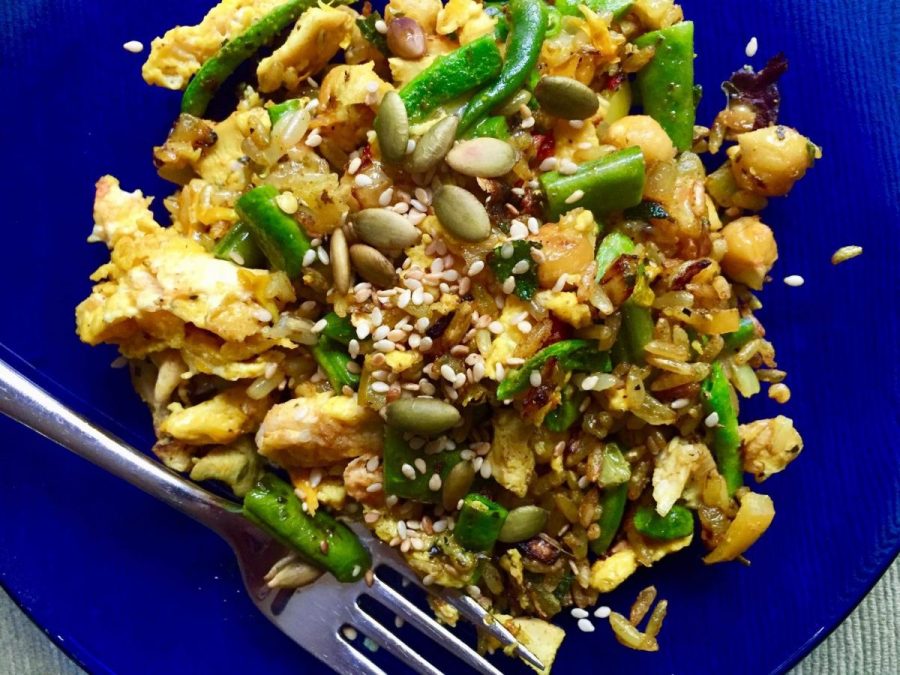
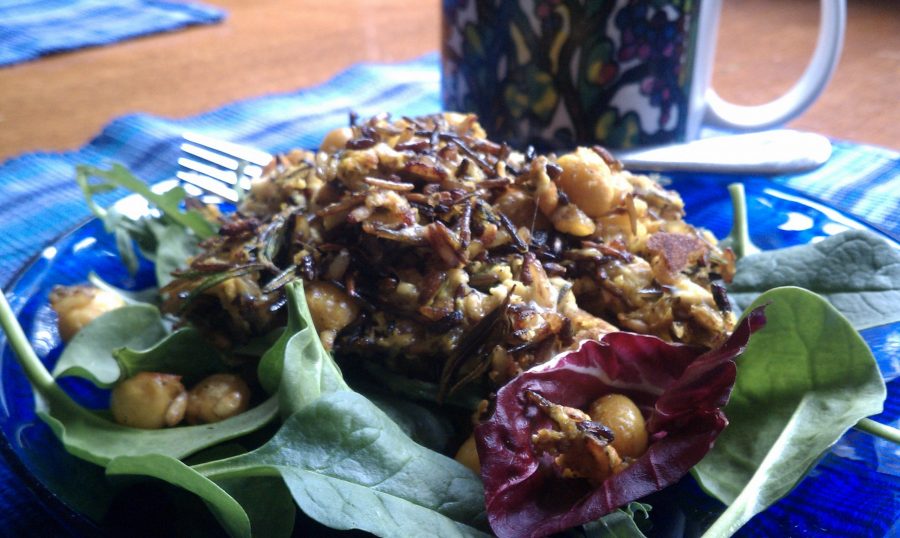
Chickpea Stir Fry
I enjoy so very many variations on this when I have chickpeas and grain hanging out in the fridge. If it’s breakfast time, I include a scrambled or fried egg. This dish feels a little Indian/Middle-Eastern but is really a hodge-podge creation.
- Saute in olive oil, butter, ghee, or Pure Indian Foods Turmeric Superghee
- Diced onion
- A little bit of chicken or ground pork/sausage, optional
- Chickpeas
- Brown rice, wild rice blend, quinoa, millet or other pre-cooked whole grain
- Sage leaves, chopped fresh (let fry in oil/butter)
- Smidge of whole cumin seeds. (let them fry a bit in the oil)
- Crushed red. pepper, optional/to taste
- Bit of turmeric, if not using turmeric ghee
- Salt and pepper to taste
- Raw or cooked greens (whatever’s on hand or weedy in the garden — dandelion, kale, spinach, chard, parsley, arugula, radicchio…)
- Any other optional veggies, such as chopped zucchini, diced mushrooms, green. beans, hot peppers
- Little bit of chopped smoked gouda, slightly melted in, optional but. yummy
- Toasted sesame and/or pepita seeds on top before serving, optional
Various Mediterranean, Middle Eastern, and Indian Dishes
Add them to Greek salad, toss into stews ranging from Indian Chana Masala to pastoral Italian Chickpea Soup. I also love adding chickpeas to the Cauliflower and Potatoes in Blackened Red Chili Sauce recipe by Raghaven Iyer (whose recipes never disappoint) in 660 Curries. Or find some fresh chickpea flour and play around with flatbread pizza crust-like Italian socca.
Creative Chickpea Recipes
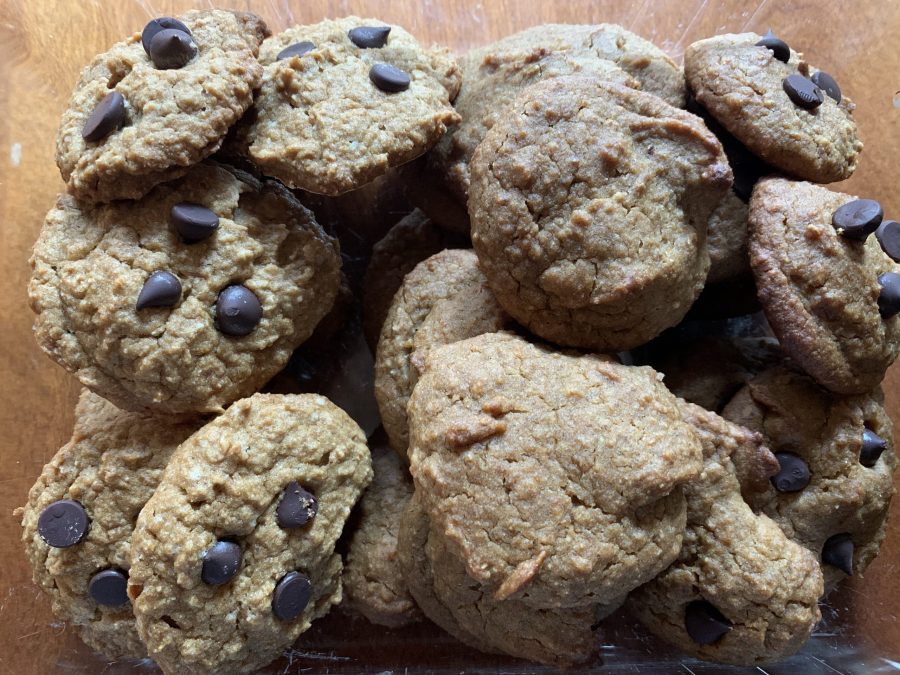
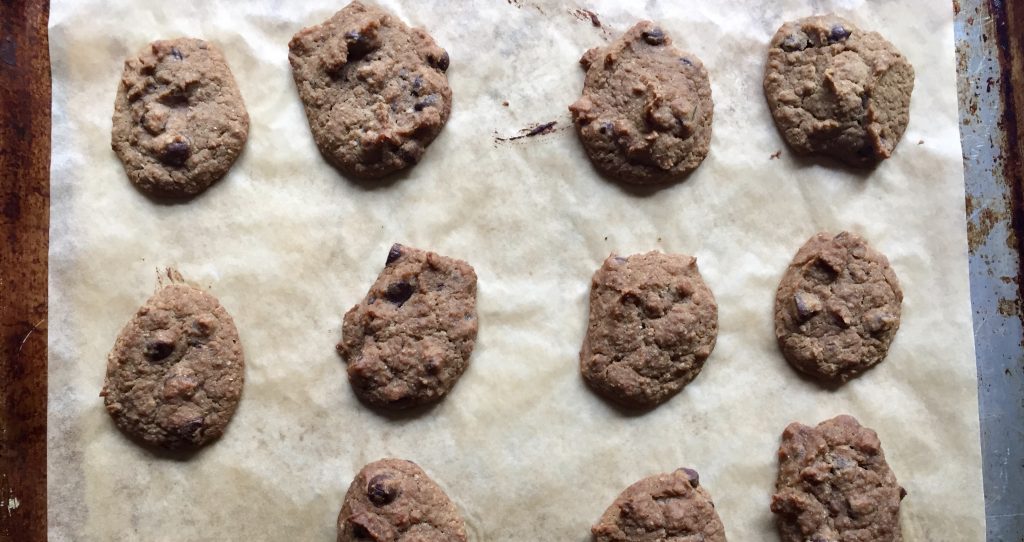
Chickpea Chocolate Chip Cookies
This recipe is based on the Detoxonista blog recipe with some adaptations. I prefer it with buckwheat flour that I grind in a bullet from whole raw buckwheat, but oat flour works, too (which you can grind from oatmeal). Feel free to play around with different combinations. Sometimes I add a half cup of my peanut butter-y seed butter. You can find peanut butter chickpea cookie recipes out on the internet, too.
- 2 cups well-cooked chickpeas (or 1 can), drained (reserve liquid)
- 1/2 cup raw buckwheat (preferred) or oat flour*
- 1/2 cup brown sugar (not packed)
- 3 tablespoons melted coconut oil
- 1 tablespoon coconut mana (aka coconut butter), optional but delicious
- 1 tablespoon or more vanilla extract
- 1/2 teaspoon salt
- 1/2 teaspoon baking soda
- 1 teaspoon raw apple cider vinegar
- 3/4 cup chocolate chips (I’m a fan of Equal Exchange)
* Grind your own flour from whole raw (not toasted) buckwheat or oatmeal in a bullet grinder.
Preheat the oven to 310.** Line a baking sheet with parchment paper.
Puree chickpeas in the food processor or blender until smooth. Add liquid ingredients and blend. Add the dry ingredients except the chips and blend again. If needed, drizzle in a little chickpea water to help it blend. Then stir in the chips. Drop the batter onto the baking sheet. This makes about 20 small cookies or 8-10 large ones.
Bake for 20-35 minutes or until they begin to get golden. (I find it actually takes 40-50 minutes. Sometimes I crank the heat to 375 at the very end for 5-10 minutes to brown them a bit.) Let cool (I like to let them cool in the warm oven since the middles are usually still a bit doughy). They have the best consistency once they have mostly cooled but are still warm. If stored on the counter, they are still nice but somewhat cake-y in texture. For a more chewy, hard cookie, store and eat them straight from the freezer.
** The original recipe calls to bake it at 350 for 18 minutes; however, I find mine are still a bit raw inside. I’m still tinkering with the perfect cooking temp and time but generally prefer a lower temp to give more time for the middle to cook. They’re done with the tops and bottoms start to get golden.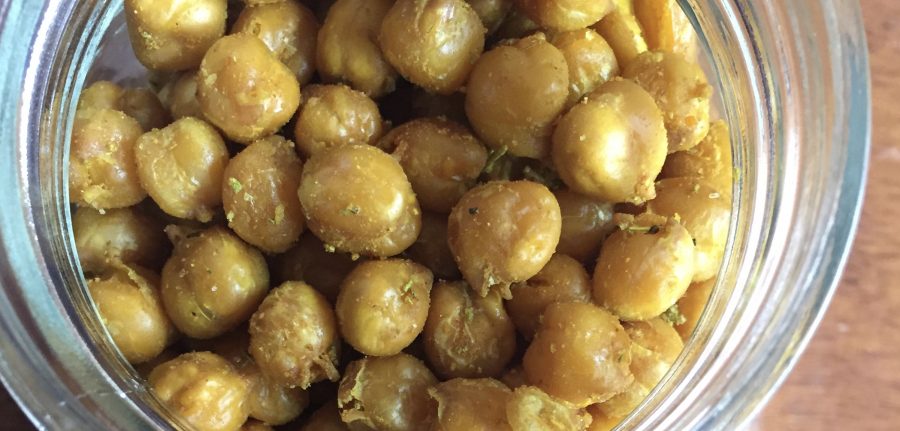
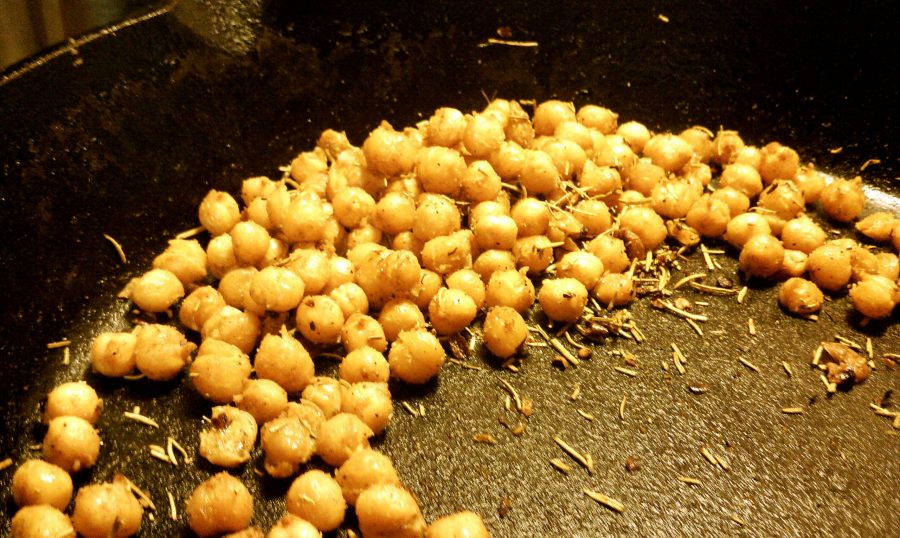
Oven-Roasted Turmeric Chickpeas
This makes a tasty, high-protein, high-fiber, gluten-free salty snack. They’re best straight from the oven (where, kind of like French fries, the outside is crispy and the inside is soft). If you let them cool on the pan, they’ll get hard and crunchy, more like a corn nut, and are relatively shelf stable in a tightly sealed jar for an on-the-go snack. Try them on top of salads in place of nuts and croutons, too. Feel free to play with different seasoning combinations. I love using turmeric and rosemary – it tastes good, and you’d be surprised how much turmeric you can put on them! But this will make the chickpeas stain your hands and whatever they touch yellow. So it might be more convenient as an on-the-go hand snack to skip the turmeric.
- 2 cups well-cooked chickpeas (or 1 can), drained
- 1-2 tablespoons extra virgin olive oil
- 1 tablespoon lightly crushed or chopped rosemary (fresh or dry)
- 1 teaspoon turmeric powder
- Salt, to taste
- Crushed red pepper, to taste
Combine all the ingredients in a heavy-bottomed pan, stir well to combine. Roast at 350 degrees until golden. Eat immediately or let cool on the pan to snack on later. If thoroughly cooked and dried (no soft middles), it will keep for a few weeks in a tightly closed jar at room temperature.
Chickpea Crackers
I’ve yet to make them, but various online recipes are available to make crackers and similar recipes with pureed chickpeas or chickpea flour – the recipes are specific for one or the other, you cannot substitute. Just google “chickpea cracker recipe.”
Oh, Aquafaba!
That liquid you drain from your chickpea can – who knew it would become a darling ingredient of hipster and vegan cuisine? The mucilaginous complex starches in the water can be whipped like egg whites to frothy stiff or soft peaks with a multitude of uses. On its own they do taste a bit like bean-y chickpea water, but the mild flavor easily takes on other ingredients. You can use a scoop of whipped aquafaba in baking recipes to replace eggs (for moisture, binding, and fluffiness in pancakes, cake, cookies…). With sugar, vanilla, and perhaps some cream of tartar, it makes a surprisingly good meringue in cookies recipes, to top pies, and decorate desserts. Craft cocktails occasionally use them to replace egg whites. Combine with neutral or olive oil to make eggless mayo and garlicy aioli. Tips on how to make aquafaba here (trick: gently simmer uncovered to reduce the liquid down a bit first). Recipes galore including cheese, marshmallow fluff, pavlova, chocolate mousse, ice cream, nougat fudge, buttercream frosting, marzipan, butter here. I’m still playing around with aquafaba with some hits and misses but have enjoyed it in baked goods, meringue cookies, garlicy olive oil aioli, and fluff.
Clinical herbalist Maria Noël Groves sees clients and teaches classes at Wintergreen Botanicals Herbal Clinic & Education Center in Allenstown, New Hampshire.
The statements made on this blog have not been evaluated by the FDA and are not intended to diagnose, prescribe, recommend, treat, cure, or offer medical advice. Please see your health care practitioner for help regarding choices and to avoid herb-drug interactions.